How to publish an app on the Google Play Store
Today we’ll be looking at how to set up and publish for Google Play.
Today we’ll be looking at how to set up and publish for Google Play.
Signing up

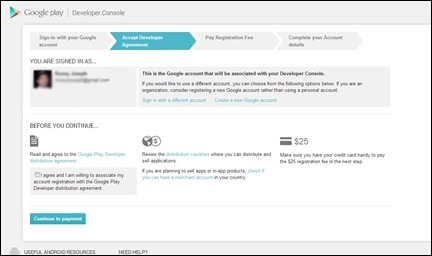
Firstly, you will have to go and register for Google Play; if you already have a Google account then you can just use this, or you can set up a new one for your developer account.
The fee for signing up is $25 and you must read and sign the developer’s agreement before continuing. Before you go ahead and start the publication process, it’s a good idea to ensure that you have all your bases covered. Google helpfully provides a Checklist for Google Play, which sets out everything you should have considered in detail before you’re ready to upload.
This includes:
- Read and understand the publishing process documentation and the Publishing Workflow to gain deeper understanding on how it works.
- Thoroughly test the app quality in a testing environment .
- Decide what content rating it should have, these are: Everyone, Low maturity, Medium maturity, High maturity.
- Decide on which countries the app is to be distributed in.
- Confirm screen sizes that the app will be compatible with.
- Prepare graphics, app description and pricing models.
There’s lots more on the list, so it’s worth checking it out as it provides a very thorough guide to what you should have already carried out before submission. Unlike Apple, Google don’t take weeks to approve your app, once published it will appear in the Store within hours, so it’s well worth the time getting it right.
The Store requires, of course, that the app adheres to the laws of whatever countries it’s going to be placed in.
If You’re Selling the App

If you plan to put a price tag on the app, then you will also need to set up a Google Wallet Merchant account. This can be done by signing into your developer account and opening financial reports on the navigation to the side. There, choose set up a Merchant Account now and you’ll be taken through to the Google Wallet site to sign up. You should check the list of merchant countries out first to ensure that it’s supported in the countries you’re selling the app in.
Getting Ready to Publish

Before publishing, you will want a couple of decent app screenshots to help it stand out in Play. You can have up to eight of them on the store and they must be PNG (24 bit) or JPEG with a minimum length of 320 pixels and maximum of 3840 pixels.
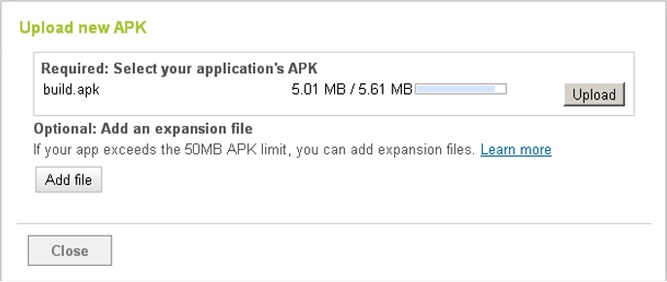
Uploading the Android Package File (APK)

When you’re sure that the app is up to the expected standard and it’s prepared for release, it’s time to decide if you’re going to release a beta version first, or a full version.
You must have a certificate with a private key before upload, as Google requires that all apps can be identified by author in order to grow trust and relationships between apps. It does not have to be signed by a certificate authority, you can use self-signed certificates once you’ve obtained a “suitable private key”.
You should also consider the EULA (End User License Agreement) and once uploaded, all debugging and logging tools/settings should be removed.
If you’re going to release a beta version first, then Play allows you to set up alpha and beta testers from anywhere in the world. You can do this from within the developer console, adding a few at a time and gaining feedback.
Not only will this help you to iron out any initial issues with the app, but it’s also a great opportunity to gain reviews.
However, feedback at beta stage goes only to your account, it doesn’t appear on the Play listing, so make sure that you contact testers after full release (if possible) to ask for a real review that will boost the apps position in the charts.
Once you’re ready to go to full release, your app should be working perfectly, so there will be no initial complaints. You’re then in a great position to sit back for a while before starting work on the next Flappy Birds.
Thanks to getappcase.